
’Kraut & Lacto Pickles

Some things are just so simple they’re kind of hard to believe. Learning their secrets leaves you hanging – that’s it? Really? There has to be something missing…Of all things, finding out about the magic behind sauerkraut was like that for me.
My grandma, who has a tendency to get rid of things she doesn’t use anymore because, sentimentality be damned, that’s the practical thing to do, had just given me one of my great-grandmother’s heavy, three-gallon earthenware crocks. Its clay rim is subtly uneven, and the brown glaze that covers the interior, the bottom half of the outside, and a stenciled number “3” shows hand-applied brush strokes. Mass-produced by individual clay workers over a hundred years ago as a functional vessel, it’s not signed by the maker. Neither is its twin brother, nearly the same but with darker brown glaze and a different stencil for the number, which came into my possession a few years later.
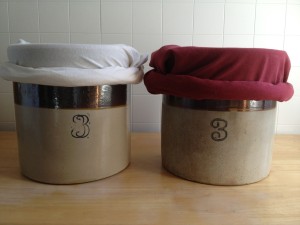
A couple crocks
I’m not entirely sure why, but I felt compelled to make sauerkraut in this old crock. I’m pretty sure my grandmother and her mother had done the same, but not while I was around to witness. Just then I found a timely article in the local alt-weekly newspaper that explained how to make the ’kraut. But it seemed too damn easy, so I ran it past Grandma to make sure the author wasn’t leaving something out. He wasn’t.
How to Make Sauerkraut
The ingredients: cabbage, kosher salt, a little water, and time. Honestly. Shred a head of green or red cabbage, put it in the crock. Mix in just enough salt so that the cabbage tastes slightly salty, but not overly so. Weight it all down with a few plates that are just slightly smaller than the diameter of your vessel and park it in a corner. Fresh cabbage will usually release enough juice to cover the shreds, but if it doesn’t after a day or two, add enough salted water to submerge the cabbage; the plates are there to help hold it under the liquid. Cover the crock with a dishtowel or pillowcase to keep the dust and bugs out (not a tight-fitting lid; it needs air), then park the whole thing in a corner somewhere and let it sit for about two weeks. That’s it.
It will smell like farts for the first week (as I learned when I lived in a shoebox apartment and had to keep the crock in my living room), so keep that in mind when selecting a fermenting location. The warmer the spot, the faster the process. If you don’t happen to have a German grandmother to bequeath you a crock (or about $90 to shell out for one at an antique store), any non-metal container will do. Buckets or big, glass jars are great alternatives. If any mold forms on the edges, just scoop it off and throw it out. When the ’kraut is done, scoop it into a sealable container, liquid and all, and put it into the fridge to stop the fermentation. The result will rival any canned or bagged crap you’ve ever bought at a supermarket; still somewhat crisp, and with that distinctive, sour tang.
Sourdough bread, kimchee, good kosher pickles tickle your tongue a little from a similar set of production circumstances. The fancy word for all of this is lacto-fermentation, and it’s been used to preserve food naturally throughout history and across cultures. Essentially, microscopic spores of wild yeast (lacto bacilla) float around in the air, land in the crock or bowl, and feed on the sugars in the food. The salt keeps it from spoiling while the yeast finishes digesting the sugars, which are what cause spoilage. When the fermentation is done, the end product keeps longer as a result. I’m not going to get into the detailed science behind how it works, but these people do a good job of explaining why it’s good for you.
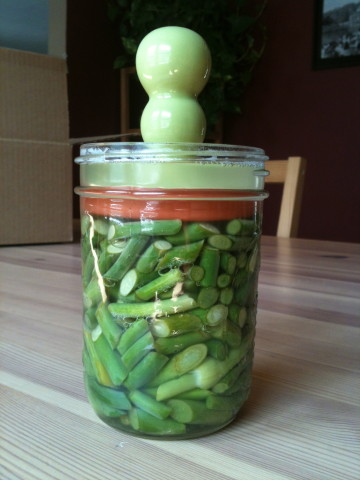
A jam jar of lacto-fermented garlic scapes in the making. I’m using a cookie press as a weight to keep the veggies under the liquid (and prevent a scum from forming).
How to Make Lacto-Fermented Pickles
The same premise used to make sauerkraut at home can also be used to make crisp, super-flavorful pickles without yanking out a canner and using tons of vinegar. Just fill a quart-sized mason jar with veggies cut into sticks or slices; great options include green beans, carrots, onion, chiogga or golden beets, celery or celeriac, purple cabbage, and garlic cloves, either mixed together or in separate jars. Cucumbers are excellent, too, but do them sliced or whole in their own jar because they tend to take less time to ferment than the harder vegetables.
Then add about two teaspoons of salt to the jar, a heaping tablespoon of spices (any combo of dill seed, peppercorns, red pepper flakes, coriander seed, cumin seed, caraway seed, star anise…you get the point; play around) and fill the jar with room-temp water. Use a jam jar filled with water to weigh down the veggies and keep them under the brine (or another clean weight; a ceramic cookie press works, too). Then just sit them on the counter covered with a cloth. Check them every day, pressing the veggies down on the weight once in while to release the bubbles, until they’re sour, wonderful pickles (about a week). Then just pop them in the fridge to stop the fermentation.
While almost everyone will rave about your sauerkraut and your lacto pickles, some will be a little creeped out if you explain how you made them. Leave food out on the counter? On purpose? Gross! Be ready for it. Mentioning that people have been doing it for hundreds of years or fermented foods’ health benefits help some people get over their initial skepticism and maybe even ask you how to make it themselves. Others, though, won’t continue eating the stuff. Which is fine – more for you.