
Kombucha

Kombucha was a “thing” before it achieved superfood status, gave hipsters another reason to carry drinks around in Ball jars, and provided a convenient out for Lindsay Lohan to say she wasn’t hitting the bottle again. This mysterious fermented tea first surfaced in China around 200 BC, made its way to Japan where mothers would pass down kombucha “mothers” to their daughters as part of the girl’s dowry, and has popped up all over the globe across history in places like Russia, Germany, and now the U.S.
So what’s the big deal with this funky, probiotic beverage? The laundry list of health benefits is a long one – research has shown that it promotes gut health, which aids digestion and strengthens your immune system, which helps ward off a whole host of ailments and diseases. Kombucha packs a lot of antioxidants and B vitamins, and has a calming effect due to the fermented yeast (you know, like beer). And because it costs a fortune to buy in stores, I’d rather make the ’buch myself at a price of less than a dollar for two gallons, a little more if you add your choice of fruit juice at the end. Don’t be afraid – just do it.
How to Make Kombucha
Original recipe courtesy of Food Renegade. I’ve made my own modifications and additional notes below based on my own experiences – kombucha, like many things, has several “right” ways to do it. Check out the links at the bottom of the original Food Renegade post for an amazing collection of FAQs, trouble-shooting, and more in-depth information.
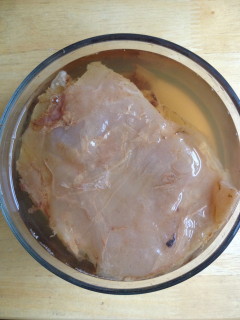
This is a scoby, or “mother.” It looks like a boogery ham steak and feels like a lung. No way to sugar-coat it.
Ingredients & gear:
- 2 gallons water
- 5-6 bags of caffeinated tea (black, green, etc.)
- 2 cups white sugar
- 2 kombucha mothers (AKA “scoby,” or “mushrooms”) – not “scooby” as tempting as it may be. Need one? Ask me.
- 2 large 1 gallon glass jars
- thin, clean kitchen towels or rags
- 15 oz of fruit juice (optional)
- 6 jars or bottles with tight-fitting lids (any size will do, so long as you’ve got enough to hold 75%-80% of your brewed kombucha)
Before you start – it’s important that everything that touches the scoby be well washed (I’m told by the sage who taught me). Wash your hands, use clean jars, clean utensils, etc. ItVs common sense, but worth mentioning anyway.
Day 1 / Part One : Make Sweetened Tea (boil water and steep tea with sugar)
Boil about 2 gallons of water on the stove top. Filtered is best, but tap works, too. Once water is at a full boil, remove from heat and add tea bags or family-sized tea bag and steep for 5 minutes. You can use cheap, plain Lipton tea for this, or experiment with other black or green teas. One of my absolute favorite combos is to throw a handful of sliced (not peeled) ginger into the water as it boils and then use green as your tea.
Remove tea bags and add 2 cups of sugar stirring vigorously until it is dissolved. You can use other sweeteners like maple (awesome with black tea) and honey, but the quantity becomes expensive and there’s no need to fear refined sugar here because it’s basically just food for the scoby. Let the sweetened tea sit on the stove top until it has cooled to room temperature. This usually takes about 2 hours.
Day 1 / Part Two : Add the Mother to the Sweetened Tea
Once tea is cooled down transfer to glass jar or jars with a wide mouth. (The kombucha tea doesn’t brew as well in metal or plastic containers. You can use a large glass bowl, glass pitchers, or a large glass sun tea jar – anything glass that will hold your tea). Pour the half cup of liquid that comes with the mother into the sweetened tea.
Carefully place the mother on top of the tea mixture.
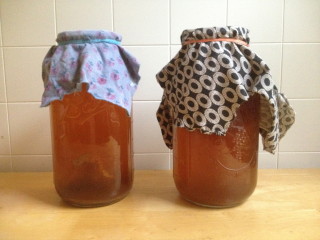
These are half-gallon ball jars covered with rags made from old clothes. Ain’t they pretty?
Cover your glass containers with a clean rag or kitchen towel and place away from direct sunlight. I secure the towel with large rubber bands. The kombucha tea needs oxygen to ferment, so you’re using a towel rather than a lid to allow air to circulate. The rubber band secures the towel to keep out flies, insects, or other contaminants.
Days 1-5: Ferment Tea(allow starter / mother to “eat” the sugar and produce acids & enzymes)
You will allow the tea mixture to set out in the dark corner of your kitchen for 5 days. Try to pick a spot that’s neither drafty nor right near a heater. On the morning of day 5, remove the mother and set it aside on a plate, pouring about a half cup of the fermented tea mixture over the scoby to keep it moist. Put it in the refrigerator. Every other batch or so, you’ll be able to separate the old mother from its “baby” which will have grown on top of the old mother. (It may separate on its own, or you may just pull them apart.) When that happens, the baby will become the mother for your next batch of kombucha tea. See the tips at the bottom of the page for storing your scobies until you’re ready to start your next batch.
Day 5 / Part One: Ferment With Fruit Juice (allow kombucha to ferment with juice for a tasty finish)
Pour clear fruit juice (no pulp, it causes much stringy nastiness!) into the smaller glass jars or bottles you’re using to bottle your kombucha. I use about 2.5 oz. of fruit juice per quart-sized jar. Because the jar will build up some natural carbonation, it’s super important that you select either a canning jar or a bottle designed to hold something carbonated (glass growlers, clean seltzer bottles, those cage-topped pop bottles, etc.). Trust me: I’ve had others explode in the middle of the night and send glass shards everywhere. You can use any size bottle or jar, just be sure to adjust the fruit juice accordingly.
Pour kombucha tea on top of the fruit juice, allowing about an ounce of breathing room at the top of the bottle, close bottle tightly. Be sure to save at least 10% of your brewed kombucha to use with your saved mother in your next batch.
Place bottles back in your “fermenting place” for 48 hours and cover with a kitchen towel so they avoid exposure to direct sunlight.
Day 5 / Part Three: Begin Your Next Batch
Repeat the process for Day 1, Parts One and Two, and use the mother you set aside earlier as the mother for this batch of kombucha tea.
Day 7: Finish
Put bottles in the refrigerator and chill completely before opening. Do not shake. When you open, remove the thin film of new “mother” that accumulated on top during the fruit juice fermentation phase. Contents will be bubbly. Enjoy the fruits of your five or ten minutes of labor.
Storing Your Scoby
To store your scoby, you can do a few things. I keep it in a glass container full of half kombucha and half new sweet tea (so it has a snack) for sometimes two months at a time. Some people will tell you that it’ll mold or die like that, but my babies have been in there for six years with no problems. You can also start a scoby hotel, which is really just a big jar left in a dark hallway or stairwell that’s full of scobies and kombucha with new sweet tea added periodically. More on that here.